

How To Create A Service In Windows Server 2012
Managing Roles, Role Services, and Features
When yous want to manage server configurations, you'll primarily employ Server Director to manage roles, role services, and features. Not only can you utilize Server Director to add or remove roles, role services, and features, but you can also use Server Manager to view the configuration details and status for these software components.
Performing Initial Configuration Tasks
Server Managing director is your cardinal direction console for the initial setup and configuration of roles and features. Not only can Server Director help you speedily ready a new server, the panel also can help you chop-chop set up your management environs.
Normally, Windows Server 2012 automatically starts Server Director whenever you lot log on and you lot can admission Server Manager on the desktop. If you don't want the panel to start each fourth dimension you lot log on, tap or click Manage and then tap or click Server Manager Properties. In the Server Manager Backdrop dialog box, select Practise Non Start Server Manager Automatically At Logon and then tap or click OK.
As Figure 2-1 shows, Server Manager's default view is the dashboard. The dashboard has quick links for adding roles and features to local and remote servers, calculation servers to manage, and creating server groups. Yous'll notice similar options are on the Manage menu:
- Add Roles And Features Starts the Add Roles And Features Wizard, which you can use to install roles, function services, and features on the server.
- Add Other Servers To Manage Opens the Add Servers dialog box, which yous can use to add servers you want to manage. Added servers are listed when you select the All Servers node. Printing and hold or right-click a server in the Servers pane of the All Servers node to display a list of management options, including Restart Server, Manage As, and Remove Server.
- Create Server Group Opens the Create Server Grouping dialog box, which you can use to add servers to server groups for easier management. Server Managing director creates part-based groups automatically. For example, domain controllers are listed under Advertisement DS, and you can quickly observe information virtually any domain controllers by selecting the related node.
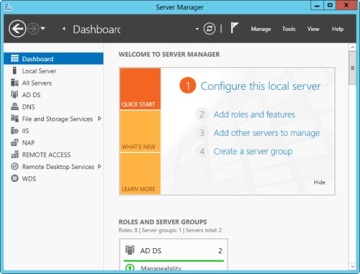
Figure ii-1 Use the dashboard for general administration.
In Server Manager'south left pane (also referred to equally the console tree), you lot'll find options for accessing the dashboard, the local server, all servers added for management, and server groups. When you lot select Local Server in the console tree, as shown in Figure 2-2, yous can manage the basic configuration of the server yous are logged on to locally.
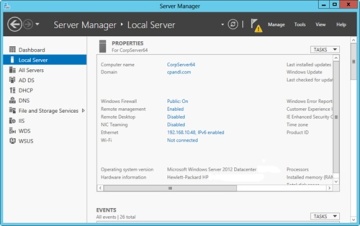
Figure 2-ii Manage the backdrop of the local server.
Data virtually the local server is organized into several main headings, each with an associated management panel:
- Best Practices Analyzer Allows yous to run the Best Practices Analyzer on the server and review the results. To start a scan, tap or click Tasks and then tap or click Showtime BPA Browse.
- Events Provides summary information about warning and fault events from the server's issue logs. Tap or click an event to brandish more information nigh the event.
- Performance Allows yous to configure and view the status of operation alerts for CPU and retentivity usage. To configure performance alerts, tap or click Tasks and and then tap or click Configure Performance Alerts.
- Properties Shows the estimator name, domain, network IP configuration, time zone, and more. Each holding tin exist clicked to quickly display a related management interface.
- Roles And Features Lists the roles and features installed on the server, in the judge order of installation. To remove a office or feature, press and hold or right-click it and and then select Remove Part Or Feature.
- Services Lists the services running on the server past proper noun, status and kickoff type. Press and agree or correct-click a service to manage its run status.
The Properties panel is where you perform much of your initial server configuration. Properties bachelor for quick direction include the post-obit:
-
Reckoner Proper noun/Domain Shows the computer name and domain. Tap or click either of the related links to brandish the System Properties dialog box with the Computer Name tab selected. You can so change a computer'southward name and domain information by tapping or clicking Change, providing the computer proper name and domain information, and then tapping or clicking OK. By default, servers are assigned a randomly generated name and are configured as function of a workgroup chosen WORKGROUP. In the Small Icons or Large Icons view of Control Panel, you can display the Arrangement Properties dialog box with the Computer Name tab selected by tapping or clicking System and and so borer or clicking Alter Settings nether Calculator Name, Domain, And Workgroup Settings.
-
Client Experience Improvement Program Shows whether the server is participating in the Customer Feel Improvement Programme (CEIP). Tap or click the related link to alter the participation settings. Participation in CEIP allows Microsoft to collect data about the manner you use the server. Microsoft collects this data to assist improve hereafter releases of Windows. No data collected as part of CEIP personally identifies y'all or your company. If you elect to participate, yous tin also provide information about the number of servers and desktop computers in your organization, also as your arrangement'south general industry. If you opt out of CEIP by turning this feature off, you lot miss the opportunity to help improve Windows.
-
Ethernet Shows the TCP/IP configuration of wired Ethernet connections. Tap or click the related link to display the Network Connections console. Yous tin then configure network connections past double-borer or double-clicking the connection you want to piece of work with so tapping or clicking Backdrop to open up the Properties dialog box. By default, servers are configured to use dynamic addressing for both IPv4 and IPv6. Yous tin also display the Network Connections panel by tapping or clicking Change Adapter Settings nether Tasks in Network And Sharing Center.
-
IE Enhanced Security Configuration Shows the status of Net Explorer Enhanced Security Configuration (IE ESC). Tap or click the related link to enable or disable IE ESC. If you tap or click the link for this option, y'all tin can turn this characteristic on or off for administrators, users, or both. IE ESC is a security feature that reduces the exposure of a server to potential attacks past raising the default security levels in Net Explorer security zones and changing default Internet Explorer settings. Past default, IE ESC is enabled for both administrators and users.
-
NIC Teaming Shows the status and configuration of NIC teaming. Tap or click the related link to add or remove teamed interfaces and to manage related options.
-
Product ID Shows the production identifier for Windows Server. Tap or click the related link to enter a product key and activate the operating organisation over the Net.
-
Remote Desktop Tap or click the related link to display the System Backdrop dialog box with the Remote tab selected. You lot tin can and so configure Remote Desktop past selecting the configuration option you want to utilise and tapping or clicking OK. By default, no remote connections to a server are allowed. In the Small Icons or Large Icons view of Control Console, you can display the System Properties dialog box with the Remote tab selected past double-borer or double-clicking System and and then tapping or clicking Remote Settings in the left pane.
-
Remote Direction Shows whether remote management of this server from other servers is enabled. Tap or click the related link to enable or disable remote management.
-
Fourth dimension Zone Shows the current fourth dimension zone for the server. Tap or click the related link to display the Date And Time dialog box. Y'all tin can then configure the server'southward time zone by tapping or clicking Change Fourth dimension Zone, selecting the advisable fourth dimension zone, and so borer or clicking OK twice. You can also display the Date And Time dialog box past pressing and holding or correct-clicking the clock on the taskbar and then selecting Adjust Engagement/Time. Although all servers are configured to synchronize time automatically with an Net fourth dimension server, the time synchronization process does not change a computer'south time zone.
-
Windows Error Reporting Shows the condition of Windows Fault Reporting (WER). Tap or click the related link to change the participation settings for WER. In most cases, yous'll want to enable WER for at to the lowest degree the outset lx days following installation of the operating organisation. With WER enabled, your server sends descriptions of bug to Microsoft, and Windows notifies you of possible solutions to those problems. Y'all can view problem reports and possible solutions using Action Eye. To open Action Center, tap or click the Activity Center icon in the notification surface area of the taskbar and then select Open up Action Heart.
-
Windows Firewall Shows the status of Windows Firewall. If Windows Firewall is active, this belongings displays the name of the firewall profile that currently applies and the firewall status. Tap or click the related link to display the Windows Firewall utility. By default, Windows Firewall is enabled. In the Small-scale Icons or Large Icons view of Control Panel, you lot tin can brandish Windows Firewall by tapping or clicking the Windows Firewall option.
-
Windows Update Shows the electric current configuration of Windows Update. Tap or click the related link to display the Windows Update utility in Control Console, which you lot can then use to enable automatic updating (if Windows Update is disabled) or to check for updates (if Windows Update is enabled). In the Modest Icons or Large Icons view of Control Panel, yous can brandish Windows Update by selecting the Windows Update option.
Server Manager Essentials and Binaries
The Server Manager console is designed to handle core system administration tasks. You'll spend a lot of time working with this tool, and y'all should get to know every detail. Past default, Server Director is started automatically. If y'all closed the console or disabled automatic startup, you can open the console by borer or clicking the related option on the taskbar. Alternatively, another mode to do this is past pressing the Windows key, typing ServerManager.exe into the Apps Search box, and so pressing Enter.
Server Manager'south command-line analogue is the ServerManager module for Windows PowerShell. When yous are logged on to Windows Server 2012, this module is imported into Windows PowerShell by default. Otherwise, you need to import the module earlier you can apply the cmdlets information technology provides. You import the ServerManager module by entering Import-Module ServerManager at the Windows PowerShell prompt. One time the module is imported, y'all can use information technology with the currently running instance of Windows PowerShell. The next fourth dimension y'all first Windows PowerShell, you need to import the module once more if you lot want to use its features.
At a Windows PowerShell prompt, you tin can obtain a detailed list of a server'due south current land with regard to roles, role services, and features by typing get-windowsfeature. Each installed role, role service, and feature is highlighted and marked equally such, and a management naming component in brackets follows the display name of each role, role service, and feature. By using Install-WindowsFeature or Uninstall-WindowsFeature followed by the direction proper noun, you can install or uninstall a role, role service, or feature. For example, you can install Network Load Balancing past entering install-windowsfeature nlb. Y'all can add together –includeallsubfeature when installing components to add all subordinate role services or features. Management tools are not included past default. To add together the management tools, add -includemanagementtools when installing components.
Binaries needed to install roles and features are referred to equally payloads. With Windows Server 2012, payloads are stored in subfolders of the %SystemDrive%\Windows\WinSXS folder. Not only can you uninstall a part or feature, merely you also can uninstall and remove the payload for a feature or role using the –Remove parameter of the Uninstall-WindowsFeature cmdlet. Subcomponents of the role or feature are removed as well. To also remove management tools, add the -includeallmanagementtools parameter.
When you lot want to install a role or feature, you tin can install the related components and restore any removed payloads for these components using the Install-WindowsFeature cmdlet. By default, when you utilise Install-WindowsFeature, payloads are restored via Windows Update.
In the post-obit example, you restore the Advertizing DS binaries and all related subfeatures via Windows Update:
install-windowsfeature -proper name ad-domain-services -includeallsubfeature
You can use the –Source parameter to restore a payload from a Windows Imaging (WIM) mountain point. For case, if your enterprise has a mounted Windows Image for the edition of Windows Server 2012 you are working with available at the network path \\ImServer18\WinS12EE, you could specify the source as follows:
install-windowsfeature -proper name advertising-domain-services -includeallsubfeature -source \\imserver18\wins12ee
Keep in heed that the path you lot specify is only used if required binaries are not plant in the Windows Side-By-Side binder on the destination server. While many large enterprises might take standard images that can be mounted using network paths, you lot also can mount the Windows Server 2012 distribution media and employ the Windows\WinSXS folder from the installation epitome as your source. To practice this, follow these steps:
-
Insert the installation disc into the server's disc drive, and so create a folder to mount the Installation prototype by entering the following command: mkdir c:\mountdir.
-
Locate the index number of the image you want to use by inbound the following command at an elevated prompt: dism /become-wiminfo /wimfile:e:\sources\install.wim, where eastward: is the drive designator of the server's disc bulldoze.
-
Mount the installation image past entering the following command at an elevated prompt: dism /mount-wim /wimfile:e:\sources\install.wim /index:2/mountdir:c:\mountdir /readonly, where e: is the bulldoze designator of the server'south disc drive, two is the index of the epitome to use, and c:\mountdir is the mount directory. Mounting the image might take several minutes.
-
Apply Install-WindowsFeature at a PowerShell prompt with the source specified as c:\mountdir\windows\winsxs, as shown in this example:
install-windowsfeature -name ad-domain-services -includeallsubfeature -source c:\mountdir\windows\winsxs
Grouping Policy can exist used to control whether Windows Update is used to restore payloads and to provide alternate source paths for restoring payloads. The policy you want to work with is Specify Settings For Optional Component Installation And Component Repair, which is under Computer Configuration\Administrative Templates\Arrangement. This policy also is used for obtaining payloads needed to repair components.
If you enable this policy (as shown in Figure 2-iii), you can do the following:
- Specify the alternate source file path for payloads as a network location. For network shares, enter the UNC path to the share, such as \\CorpServer82\WinServer2012\. For mounted Windows images, enter the WIM path prefixed with WIM: and including the index of the image to use, such every bit WIM:\\Corp Server82\WinServer2012\install.wim:iv.
- Specify that Windows Update should never be used to download payloads. If you enable the policy and use this option, you do not have to specify an alternate path. In this case, payloads cannot exist obtained automatically and administrators will demand to explicitly specify the alternate source path.
- Specify that Windows Update should exist used for repairing components rather than Windows Server Update Services.

Figure 2-3 Control component installation through Grouping Policy.
Managing Your Servers Remotely
You can apply Server Managing director and other Microsoft Management Consoles (MMCs) to perform some management tasks on remote computers, as long every bit the computers are in the same domain or you are working in a workgroup and have added the remote computers in a domain as trusted hosts. You lot can connect to servers running full-server, minimal-interface, and Server Core installations. On the computer yous want to employ for managing remote computers, y'all should exist running either Windows Server 2012 or Windows 8 and you need to install the Remote Server Administration Tools.
With Windows Server 2012, the Remote Server Administration Tools are installed as a feature using the Add Roles And Features Wizard. If the binaries for the tools have been removed, you need to install the tools by specifying a source, equally discussed in "Server Manager Essentials and Binaries" earlier in the chapter.
You can get the Remote Server Assistants Tools for Windows viii every bit a download from the Microsoft Download Center (http://download.microsoft.com). Different versions are available for x64 and x86 systems.
Past default, remote management is enabled for servers running Windows Server 2012 for ii types of applications and commands:
- Applications and commands that use Windows Remote Management (WinRM) and Windows PowerShell remote access for management
- Applications and commands that use Windows Management Instrumentation (WMI) and Distributed Component Object Model (DCOM) remote access for direction
These types of applications and commands are permitted for remote management considering of exceptions configured in Windows Firewall, which is enabled by default for Windows Server 2012. In Windows Firewall, exceptions for allowed apps that support remote direction include the following:
- Windows Management Instrumentation
- Windows Remote Management
- Windows Remote Management (Compatibility)
In Windows Firewall With Advanced Security, at that place are inbound rules that stand for to the standard firewall allowed apps:
- For WMI, the inbound rules are Windows Management Instrumentation (WMI-In), Windows Management Instrumentation (DCOM-In), and Windows Direction Instrumentation (ASync-In).
- For WinRM, the matching inbound dominion is Windows Remote Management (HTTP-In).
- For WinRM compatibility, the matching inbound dominion is Windows Remote Management - Compatibility Mode (HTTP-In).
You manage these exceptions or rules in either the standard Windows Firewall or in Windows Firewall With Advanced Security, not both. If you want to allow remote direction using Server Manager, MMCs, and Windows PowerShell, you typically desire to permit WMI, WinRM, and WinRM compatibility exceptions in Windows Firewall.
When you are working with Server Manager, you lot tin can select Local Server in the console tree to view the status of the remote management belongings. If you don't desire to let remote management of the local server, click the related link. In the Configure Remote Management dialog box, clear Enable Remote Management Of This Server From Other Computers and then tap or click OK.
When you clear Enable Remote Management Of This Server From Other Computers and and then tap or click OK, Server Manager performs several background tasks that disable Windows Remote Management (WinRM) and Windows PowerShell remote access for direction on the local server. One of these tasks is to turn off the related exception that allows apps to communicate through Windows Firewall using Windows Remote Direction. The exceptions for Windows Management Instrumentation and Windows Remote Management (Compatibility) aren't affected.
You must be a member of the Administrators group on computers yous desire to manage by using Server Manager. For remote connections in a workgroup-to-workgroup or workgroup-to-domain configuration, you should be logged on using the built-in Administrator account or configure the LocalAccountTokenFilterPolicy registry fundamental to permit remote access from your computer. To set up this fundamental, enter the following command at an elevated, administrator command prompt:
reg add together HKLM\SOFTWARE\Microsoft\Windows\CurrentVersion\Policies\System /v LocalAccountTokenFilterPolicy /t REG_DWORD /d one /f
Many other types of remote direction tasks depend on other exceptions for Windows Firewall. Go on the post-obit in mind:
- Remote Desktop is enabled or disabled separately from remote direction. To allow someone to connect to the local server using Remote Desktop, y'all must let related connections to the computer and configure access as discussed in Chapter 4.
- Remote Service Direction must be configured as an immune app in Windows Firewall to remotely manage a computer's services. In the avant-garde firewall, at that place are several related rules that allow management via Named Pipes (NP) and Remote Procedure Calls (RPC).
- Remote Issue Log Management must be configured equally an allowed app in Windows Firewall to remotely manage a calculator's event logs. In the advanced firewall, there are several related rules that allow direction via NP and RPC.
- Remote Volume Management must exist configured equally an allowed app in Windows Firewall to remotely manage a estimator'south volumes. In the advanced firewall, there are several related rules that permit management of the Virtual Disk Service and Virtual Disk Service Loader.
- Remote Scheduled Task Management must be configured equally an allowed app in Windows Firewall to remotely manage a computer's scheduled tasks. In the advanced firewall, there are several related rules that permit direction of scheduled tasks via RPC.
Only Remote Service Management is enabled by default.
Y'all can configure remote management on a Server Core installation of Windows Server 2012 using Sconfig. Start the Server Configuration utility by inbound sconfig.
Connecting to and Working with Remote Servers
Using Server Manager, you can connect to and manage remote servers, provided that you've added the server for management. To add servers ane at a fourth dimension to Server Manager, complete these steps:
-
Open up Server Director. In the left pane, select All Servers to view the servers that take been added for management already. If the server you want to piece of work with isn't listed, select Add together Servers on the Manage carte to brandish the Add Servers dialog box.
-
The Add Servers dialog box has several panels for adding servers:
-
The Active Directory console, selected by default, allows you to enter the computer name or fully qualified domain name of the remote server that is running Windows Server. After you enter a name, tap or click Find At present.
-
The DNS panel allows you lot to add servers past computer name or IP address. Subsequently you enter the name or IP address, tap or click the Search button.
-
-
In the Name list, double-tap or double-click the server to add information technology to the Selected list.
-
Repeat steps ii and 3 to add together others servers. Tap or click OK.
To add together many servers to Server Manager, yous can use the Import process and these steps:
- Create a text file that has one host name, fully qualified domain name, or IP accost per line.
- In Server Managing director, select Add Servers on the Manage menu. In the Add together Servers dialog box, select the Import panel.
- Tap or click the options button to the right of the File box, and so apply the Open dialog box to locate and open the server list.
- In the Computer list, double-tap or double-click each server yous desire to add to the Selected list. Tap or click OK.
After you add a remote reckoner, the Server Manager console shows the name of the remote computer in the All Servers view. Server Manager e'er resolves IP addresses to host names. As shown in Figure 2-4, the All Servers view also lists the Manageability status of the server also. If a server is listed as "Not accessible," you lot typically demand to log on locally to resolve the problem.
In the All Servers view, the servers you add are listed in the Servers pane so that you can manage them each time you work with Server Managing director. Server Manager tracks the services, events, and more for each added server, and each server is added to the appropriate server groups automatically based on the roles and features installed.
Automatically created server groups brand it easier to manage the various roles and features that are installed on your servers. If yous select the AD DS group, as an instance, you see a list of the domain controllers you lot added for management as well every bit whatsoever disquisitional or alert events for these servers and the condition of services the role depends on.
If you want to group servers past section, geographic location, or otherwise, y'all can create your own server groups. When y'all create groups, the servers you want to work with don't have to be added to Server Manager already. You tin can add together servers by searching Active Directory or DNS, or by importing a list of host names, fully qualified domain names, or IP addresses. Any server you lot add to a custom grouping is added automatically for direction equally well.
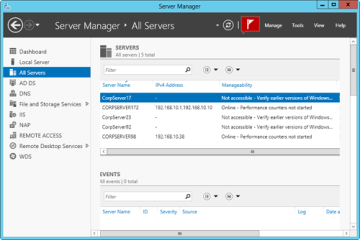
Figure 2-four Note the Manageability status of each server, and take corrective deportment equally necessary.
To create a server grouping, complete these steps:
-
Open Server Manager. Select Create Server Group on the Manage menu to display the Create Server Group dialog box.
-
Enter a descriptive name for the group. Use the panels and options provided to add servers to the group. Keep the post-obit in mind:
-
The Server Pool pane, selected past default, lists servers that have been added for management already. If a server you want to add to your group is listed here, add together it to the group by double-tapping or double-clicking it.
-
The Active Directory console allows you to enter the reckoner name or fully qualified domain name of the remote server that is running Windows Server. Afterwards you enter a name, tap or click Find Now. In the Proper name list, double-tap or double-click a server to add it to the Selected list.
-
The DNS panel allows y'all to add together servers by computer proper name or IP address. After you enter the proper noun or IP address, tap or click the Search button. In the Proper noun list, double-tap or double-click a server to add information technology to the Selected list.
-
The Import panel allows y'all to import a list of servers. Tap or click the options button to the right of the File box, and then use the Open dialog box to locate and open the server list. In the Computer list, double-tap or double-click a server to add information technology to the Selected list.
-
-
Tap or click OK to create the server grouping.
When yous press and concord or correct-click a server name in the Servers pane of a server group or in the All Servers view, you display an extended listing of management options. These options perform the corresponding chore or open the corresponding management tool with the selected server in focus. For example, if y'all were to right-click CorpServer172 and then select Reckoner Management, Computer Management connects to CorpServer172 and so opens.
Yous can work with a remote computer using an interactive remote Windows PowerShell session. To do this, open an elevated, administrator Windows PowerShell prompt. Type enter-pssession ComputerName –credential UserName , where ComputerName is the name of the remote computer and UserName is the proper noun of a user who is a fellow member of the Administrators group on the remote figurer or in the domain of which the remote computer is a member. When prompted to enter the authorized user'south password, blazon the password and so press Enter. You lot tin can now enter commands in the session as yous would if you lot were using Windows PowerShell locally. To exit the session, enter leave-pssession.
The post-obit example enters an interactive remote session with Server85 using the credentials of Williams:
enter-pssession server85 -credential williams
Calculation and Removing Roles, Role Services, and Features
Server Manager automatically creates server groups based on the roles of the servers added for management. As an example, the first fourth dimension you add together a domain controller, Server Managing director might create AD DS, DNS, and File And Storage Services groups to assistance you more than easily track the roles of the domain controllers.
When you select a role-based grouping in the left pane, the Servers panel shows the servers y'all added for management that have this function. The details for the selected server group provide the post-obit information:
- Summary information nigh events. Server Manager lists recent warning and error events. If you tap or click an event, you can go more than information about the outcome.
- Summary data about the status of related system services. You tin can press and hold or right-click a service to manage its run condition.
You can manage a service by pressing and holding or right-clicking the service and then tapping or clicking Stop Service, Start Service, Pause Service, Resume Service, or Restart Service every bit advisable. In many cases, if a service isn't running every bit y'all think it should, you lot can apply the Restart option to resolve the issue by stopping so starting the service. See Chapter 3. for detailed information well-nigh working with events and system services.
The Manage bill of fare has ii key options for working with roles and features:
- Add Roles And Features Starts the Add Roles And Features Magician, which you can use to install roles and features on a server added for management.
- Remove Roles And Features Starts the Remove Roles And Features Sorcerer, which you tin use to uninstall roles and features on a server added for management.
With Windows Server 2012, yous tin install roles and features on running servers (whether physical machines or virtual) as well as virtual hard disks. Servers must be added for direction in Server Manager, and they must be online. Virtual hard disks that you desire to piece of work with don't have to be online, only they must be selectable when yous are browsing for them. Because of this, you might need to map a network drive to access a network share. With this in mind, you can add a server role or feature by following these steps:
-
In Server Director, select Add together Roles And Features on the Manage card. This starts the Add Roles And Features Wizard. If the wizard displays the Before Y'all Begin folio, read the introductory text and then tap or click Side by side. You tin avoid seeing the Before You Begin page the next fourth dimension you start this wizard by selecting the Skip This Page By Default check box earlier tapping or clicking Next.
-
On the Installation Type page, Role-Based Or Feature-Based Installation is selected by default. Tap or click Next.
-
On the Server Selection page, y'all tin choose to install roles and features on running servers or virtual hard disks. Either select a server from the server pool or select a server from the server pool on which to mount a virtual hard disk (VHD). If you are adding roles and features to a VHD, tap or click Browse and then utilise the Browse For Virtual Hard Disks dialog box to locate the VHD. When you are fix to continue, tap or click Next.
-
On the Server Roles folio, select the role or roles to install. If additional features are required to install a function, you lot'll run into an boosted dialog box. Tap or click Add Features to close the dialog box and add together the required features to the server installation. Tap or click Next to continue.
-
On the Features page, select the characteristic or features to install. If boosted features are required to install a feature you selected, you'll meet an additional dialog box. Tap or click Add Features to close the dialog box and add together the required features to the server installation. When you lot are set up to proceed, tap or click Next.
-
With some roles, you'll come across an extra wizard page, which provides additional data about using and configuring the office. You lot may besides take the opportunity to install additional role services as part of a part. For example, with Print And Certificate Services, Web Server Role (IIS), and WSUS, yous'll see an additional data page and a page for selecting role services to install along with the role.
-
On the Confirmation folio, tap or click the Export Configuration Settings link to generate an installation report that tin can be displayed in Internet Explorer.
-
If the server on which you want to install roles or features doesn't have all the required binary source files, the server gets the files via Windows Update by default or from a location specified in Group Policy. You lot also can specify an alternate path for the source files. To exercise this, click the Specify An Alternate Source Path link, type that alternating path in the box provided, and and then tap or click OK. For example, if you mounted a Windows prototype and made it available on the local server as discussed in "Server Director Essentials and Binaries" earlier, you could enter the alternate path as c:\mountdir\windows\winsxs. For network shares, enter the UNC path to the share, such every bit \\CorpServer82\WinServer2012\. For mounted Windows images, enter the WIM path prefixed with WIM: and including the index of the image to apply, such as WIM:\\CorpServer82\WinServer2012\install.wim:4.
-
Later you review the installation options and salvage them every bit necessary, tap or click Install to begin the installation process. The Installation Progress page tracks the progress of the installation. If y'all close the wizard, tap or click the Notifications icon in Server Manager and so tap or click the link provided to reopen the wizard.
-
When the wizard finishes installing the server with the roles and features y'all selected, the Installation Progress folio volition be updated to reflect this. Review the installation details to ensure that all phases of the installation were completed successfully.
Note any additional actions that might exist required to complete the installation, such as restarting the server or performing additional installation tasks.
If any portion of the installation failed, note the reason for the failure. Review the Server Manager entries for installation problems and have cosmetic actions as appropriate.
You tin remove a server role or feature past following these steps:
-
In Server Managing director, select Remove Roles And Features on the Manage menu. This starts the Remove Roles And Features Wizard. If the wizard displays the Before Yous Begin page, read the introductory text and then tap or click Next. You can avoid seeing the Before You Brainstorm folio the next time you start this magician by selecting the Skip This Page By Default check box earlier tapping or clicking Adjacent.
-
On the Server Selection page, yous tin cull to remove roles and features from running servers or virtual hard disks. Either select a server from the server pool or select a server from the server puddle on which to mount a virtual hard deejay (VHD). If you are removing roles and features from a VHD, tap or click Browse and then use the Browse For Virtual Hard Disks dialog box to locate the VHD. When yous are ready to keep, tap or click Next.
-
On the Server Roles folio, clear the cheque box for the role you want to remove. If you try to remove a role that another part or feature depends on, a warning prompt appears stating that y'all cannot remove the role unless you remove the other function equally well. If you tap or click the Remove Features button, the wizard removes the dependent roles and features also. Notation that if you desire to continue related management tools, you should articulate the Remove Management Tools cheque box prior to tapping or clicking the Remove Features button and then click Continue. Tap or click Side by side.
-
On the Features page, the currently installed features are selected. To remove a feature, clear the related bank check box. If you try to remove a feature that another characteristic or role depends on, you'll see a warning prompt stating that you cannot remove the characteristic unless you lot also remove the other feature or role. If you tap or click the Remove Features button, the wizard removes the dependent roles and features every bit well. Note that if you want to proceed related direction tools, yous should clear the Remove Management Tools check box and so click Continue prior to tapping or clicking the Remove Features button. Tap or click Adjacent.
-
On the Confirmation folio, review the related components that the wizard will remove based on your previous selections and and so tap or click Remove. The Removal Progress page tracks the progress of the removal. If you close the wizard, tap or click the Notifications icon in Server Manager then tap or click the link provided to reopen the magician.
-
When the wizard finishes modifying the server configuration, you lot'll run across the Removal Progress folio. Review the modification details to ensure that all phases of the removal process were completed successfully.
Notation any additional actions that might be required to consummate the removal, such as restarting the server or performing additional removal tasks.
If whatsoever portion of the removal failed, note the reason for the failure. Review the Server Manager entries for removal bug and have corrective actions as appropriate.

How To Create A Service In Windows Server 2012,
Source: https://www.microsoftpressstore.com/articles/article.aspx?p=2201312&seqNum=4
Posted by: browningsubtromed87.blogspot.com
0 Response to "How To Create A Service In Windows Server 2012"
Post a Comment